3 ways to remove ‘News and interests’ from Windows 10 taskbar
‘News and interests’ one day appeared in everyone’s taskbar; apparently Microsoft thought we wanted to see ads news only one click away!
Some users have reported that “News and interests” can slow down their computer or cause other performance issues. If you’re experiencing any problems with the feature, disabling it from the taskbar may help improve your system’s performance.
In addition, there are certain environments where it’s not appropriate or necessary to have this showing. Fortunately, it’s easy to remove “News and interests” from the Windows 10 taskbar. Here’s how:
Method 1 – Manually Removing

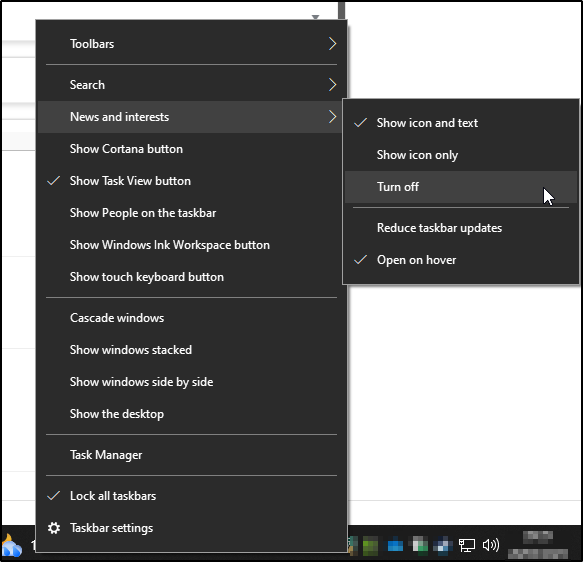
- Right-click on an empty space on your taskbar.
- Hover over “News and interests.”
- Select “Turn off” from the context menu that appears.
Method 2 – Modify the Registry
If you’re comfortable modifying the Windows Registry, you can remove “News and interests” by setting the HKEY_CURRENT_USER\Software\Microsoft\Windows\CurrentVersion\Feeds registry key to 0. Here’s how:
- Press the Windows key + R on your keyboard to open the Run dialog box.
- Type “
regedit” (without quotes) and press Enter. - Navigate to
HKEY_CURRENT_USER\Software\Microsoft\Windows\CurrentVersion\Feeds. - Double-click on the “
ShellFeedsTaskbarViewMode” value. - Change the value data to
0. - Click OK and close the Registry Editor.
- Restart your computer.
Method 3 – Group Policy
This method applies to Windows 10 Pro/Enterprise/Education only.
- Press the Windows key + R on your keyboard to open the Run dialog box.
- Type “
gpedit.msc” (without quotes) and press Enter. - Navigate to
Computer Configuration > Administrative Templates > Windows Components > News and interests. - Double-click on the “
Enable news and interests on the taskbar” policy. - Select the “
Disabled” option. - Click OK and close the Group Policy Editor.
If these policies are not showing on your domain controller, you will need to manually update your admx files from Microsoft
It’s worth noting that removing “News and interests” from your taskbar won’t uninstall the feature entirely. It will still be available if you choose to access it through the Start menu or Windows search. However, removing it from the taskbar can help declutter your desktop and provide a more focused workspace.


