3 ways to remove ‘News and interests’ from Windows 10 taskbar

Date : March 20, 2023

‘News and interests’ one day appeared in everyone’s taskbar; apparently Microsoft thought we wanted to see ads news only one click away!

Some users have reported that “News and interests” can slow down their computer or cause other performance issues. If you’re experiencing any problems with the feature, disabling it from the taskbar may help improve your system’s performance.

In addition, there are certain environments where it’s not appropriate or necessary to have this showing. Fortunately, it’s easy to remove “News and interests” from the Windows 10 taskbar. Here’s how:

Method 1 – Manually Removing

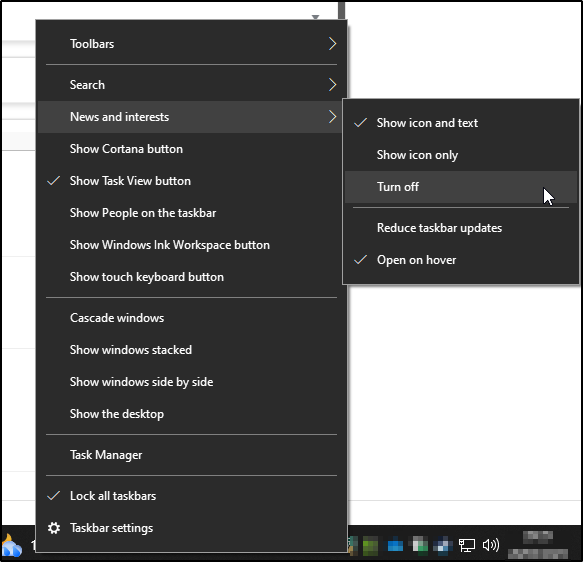
  1. Right-click on an empty space on your taskbar.
  2. Hover over “News and interests.”
  3. Select “Turn off” from the context menu that appears.

Method 2 – Modify the Registry

If you’re comfortable modifying the Windows Registry, you can remove “News and interests” by setting the HKEY_CURRENT_USER\Software\Microsoft\Windows\CurrentVersion\Feeds registry key to 0. Here’s how:

  1. Press the Windows key + R on your keyboard to open the Run dialog box.
  2. Type “regedit” (without quotes) and press Enter.
  3. Navigate to HKEY_CURRENT_USER\Software\Microsoft\Windows\CurrentVersion\Feeds.
  4. Double-click on the “ShellFeedsTaskbarViewMode” value.
  5. Change the value data to 0.
  6. Click OK and close the Registry Editor.
  7. Restart your computer.

Method 3 – Group Policy

This method applies to Windows 10 Pro/Enterprise/Education only.

  1. Press the Windows key + R on your keyboard to open the Run dialog box.
  2. Type “gpedit.msc” (without quotes) and press Enter.
  3. Navigate to Computer Configuration > Administrative Templates > Windows Components > News and interests.
  4. Double-click on the “Enable news and interests on the taskbar” policy.
  5. Select the “Disabled” option.
  6. Click OK and close the Group Policy Editor.

If these policies are not showing on your domain controller, you will need to manually update your admx files from Microsoft

It’s worth noting that removing “News and interests” from your taskbar won’t uninstall the feature entirely. It will still be available if you choose to access it through the Start menu or Windows search. However, removing it from the taskbar can help declutter your desktop and provide a more focused workspace.


Modifying the Subnet Mask of a DHCP Scope on Windows Server

Date : March 20, 2023

Introduction

In certain situations, it may be necessary to change the subnet mask of a DHCP scope on a Windows Server. This can be done through a series of steps, including: exporting the DHCP scope configuration, modifying the configuration with the new subnet mask, deleting the DHCP scope, and importing the new configuration.

Modifying the Subnet Mask

The modifications can be made using either PowerShell cmdlets or the netsh utility from a command prompt in administrator mode.

Step 1: Export the existing DHCP scope

To export the scope configuration, use the netsh command:

netsh dhcp server \\HOSTNAME_OF_DHCP_SERVER scope 172.16.X.X dump > C:\dhcp.txt

or the PowerShell command:

Export-DhcpServer -ComputerName HOSTNAME_OF_DHCP_SERVER -Leases -File C:\dhcp.xml -Verbose -ScopeId 172.16.X.X

Step 2: Modify the DHCP config file

Once the configuration is exported, it can be modified with the new subnet mask. Open the exported file in notepad and amend the subnet mask as needed:

netsh method
PowerShell method

Step 3: delete the old DHCP scope

After the modifications are made, the DHCP scope must be deleted before importing the new configuration file. To delete the scope, right-click on the range and select “Delete.”

Deleting the DHCP scope

Step 4: import the new scope

To import the new scope configuration, use the netsh command:

netsh exec c:\dhcp.txt

or PowerShell command:

Import-DhcpServer -ComputerName HOSTNAME_OF_DHCP_SERVER -File C:\dhcp.xml -Verbose -ScopeId 172.16.X.X -Lease -BackupPatch C:\dhcp_backup

Validation

To ensure that the scope has been properly imported and the new mask is applied, check in the DHCP console that the scope has been imported and check the properties to verify that the new mask is properly applied.

If you are using a DHCP failover configuration, you must reconfigure the scope failover and update any equipment with a fixed IP configuration.

Conclusion

Modifying the subnet mask of a DHCP scope on a Windows Server can be a complex process, but by following the steps outlined in this article and preparing for the change in advance, the process can be successfully completed. Always be sure to validate and ensure the new scope will not clash with an existing one, and schedule the change at a time when the load on the network is light. Make sure to also reconfigure the DHCP failover if you are using it.


Cannot change 3.5mm audio jack settings on Dell Latitude – (Realtek / Waves Audio / MaxxAudio)

Date : December 3, 2021
Cannot change 3.5mm audio jack settings on Dell Latitude – (Realtek / Waves Audio / MaxxAudio)

Issue

When plugging a device into the 3.5mm audio jack on certain Dell Latitude laptops, the user will be prompted to specify which type of device it is. As such they decide if the audio jack behaves as either an input, output, or both.

If the user checks the ‘Don’t show this dialog again’ box, the user is unable to change these settings again (even after a driver reinstall)

This is problematic if the user has selected the incorrect device, as they have no way to amend this.

Solution

Open regedit.exe and browse to

HKLM\SOFTWARE\Waves Audio\MaxxAudio\General

and change the value of DoNotShowJackSenseDialog (DWORD) to 0

This change takes effect immediately – no restart required; remove and re-insert the 3.5 mm audio device and the prompt will reappear.


VPN error – “The computer must be trusted for delegation and the current user account must be configured to allow delegation”

Date : September 1, 2021

Issue

Whilst attempting to connect to an RRAS server, Windows displays the following error message:

Cannot connect to [VPN profile]

The requested operation cannot be completed. The computer must be trusted for delegation and the current user account must be configured to allow delegation

Solution

On the VPN client, browse to the following registry key:

HKEY_LOCAL_MACHINE\SOFTWARE\Microsoft\Cryptography\Protect\Providers\df9d8cd0-1501-11d1-8c7a-00c04fc297eb

then create/update the following DWORD entry:

ProtectionPolicy=1

Alternatively, download and run the following .reg file to create/update the registry entry:


How to migrate your Windows installation and data from a Hard Drive to Solid State Drive (SSD) without reinstalling

Date : March 14, 2021

A SSD (Solid State Drive) is one of the best bang-for-buck upgrades you can perform on an older computer, typically decreasing the boot time by well over half. It can truly bring a 3-6 year old PC back from the garbage pile to something very usable.

If you’re tasked with swapping a Hard Drive out for an SSD, it can seem daunting at first, but it’s far easier than you could imagine:

Determining which type of SSD you require

Computer SSD’s typically come in two form-factors: 2.5″ SATA, and m.2

The first step before committing to an upgrade would be to open the desktop or laptop computer to determine:

a) is the drive is physically accessible? This can be very fiddly with some laptops and all-in-one desktops- a quick search of the model on YouTube or searching for the workshop manual on Google will almost always give you the answer

b) which form-factor do you require? Most likely, the answer will be a 2.5″ SATA drive. However, you may find an unpopulated m.2 slot on the motherboard, allowing you to add an SSD alongside your existing drive.

Equipment needed

At the time of writing, these are the most popular 2.5″ SATA and m.2 SSD’s on Amazon

2.5″ SATA SSD’s:

m.2 SSD’s:

If you’re installing a 2.5″ SSD, you’ll also require a USB adapter to allow you to clone the data over from the old drive to the new:

Step 1 – Downloading the Cloning software

The go-to software for this has been Macrium Reflect Free Edition, and for good reason – it’s free for both home and commercial use, and it’s very reliable! (When downloading, there is no need to enter an email or register)

(more…)

Apple Configurator 2: “The operation couldn’t be completed. (AMRestoreErrorDomain error 4 – failed to handle message type StatusMsg) [AMRestoreErrorDomain – 0x4 (4)]”

Date : September 26, 2020
Apple Configurator 2: “The operation couldn’t be completed. (AMRestoreErrorDomain error 4 – failed to handle message type StatusMsg) [AMRestoreErrorDomain – 0x4 (4)]”

Problem

Whilst trying to restore iOS or iPadOS devices in Apple Configurator 2, you receive the following error message after the device reboots into restore mode:

"The operation couldn’t be completed. (AMRestoreErrorDomain error 4 - failed to handle message type StatusMsg) [AMRestoreErrorDomain – 0x4 (4)]"

iPad (7th Gen), Apple Configurator 2.13.1, running on macOS 10.15: Catalina, attempting to restore iPadOS 14

Solution

  1. Unplug all iOS devices and close Apple Configurator
  2. Open the Finder app and plug in one of the affected devices
  3. The device should appear in the left-hand column; click on it
  4. Follow the instructions to restore the device. As part of this process, you will be prompted to download and install a smaller update on the Mac itself, separate to the iOS. This is the golden ticket!

Once the update has fully completed, you can then re-open Apple Configurator and plug in all devices; all should now restore without issue.


Troubleshooting the “Force a Specific Default Lock Screen and Login Image” Policy in Windows 10

Date : December 22, 2019

Problem

You have enabled the “Force a specific default lock screen and login image” policy in the Administrative Templates under the Control Panel \ Personalization section, but it is not taking effect on your Windows 10 machine.

Cause

This policy is only applicable to Windows 10 Enterprise or Education SKUs. It is not supported or applicable to Windows 10 Pro (and lower) SKUs.

Resolution

To use the “Force a specific default lock screen and login image” policy, you must have a Windows 10 Enterprise or Education SKU. If you are using a different SKU, you will need to upgrade to one of these SKUs in order to use this policy.


Deploying WPA2 WiFi profile (including Pre-Shared key) using Group Policy

Date : April 13, 2019

Problem

Whilst there is a setting in Group Policy Preferences to deploy WiFi settings, this does not include the WiFi Pre-Shared Key (PSK).

The following method will allow you to also push out the Pre-Shared Key:

Solution

From a PC that already has the WiFi profile installed, open command prompt (as admin) and run the following command:

netsh wlan show profiles

Make a note of the name of the profile you want to export – such as MyWiFiSSID

Run the following command, replacing the profile name with the one you wish to export, and path to an existing folder where an XML file will be created

netsh wlan export profile name="MyWiFiSSID" folder=C:\WLAN key=clear

(Note that the key=clear is vital for this to work)

Copy that XML file to a network share that is accessible from the computer accounts. Do bear in mind the WiFi key is visible in plain text within this file, so consideration must be taken as where/how to store it.

The following command is used to install the profile:

netsh wlan add profile filename="\\servername\share\Wi-Fi-MyWiFiSSID.xml" user=all

… however, this will reinstall and reconnect the WiFi profile each time, causing a brief disconnect at startup.

From my experience, the best method is to create a Computer Startup .bat script GPO that will only run once. This one does the trick:

WiFi_deploy.bat

netsh wlan show profile MyWiFiSSID
if %errorlevel%==0 goto end
netsh wlan add profile filename="\\servername\share\Wi-Fi-MyWiFiSSID.xml" user=all
:END

Many thanks to Ignacio for this more elegant deployment solution!


How to fix: “NBP filesize is 0 bytes” when PXE booting. PXE-E23 error.

Date : September 6, 2018

Issue

When attempting to PXE boot a UEFI machine, the following error is displayed:

NBP filename is boot\x64\wdsmgfw.efi
NBP filesize is 0 Bytes
PXE-E23: Client received TFTP error from server


Solution

Copy "C:\Windows\System32\RemInst\boot\x64\wdsmgfw.efi" to “<WDS root>\Boot\x64\wdsmgfw.efi

This error is caused by wdsmgfw.efi missing from <WDS root>\boot\x64\ directory.


Hang on Startup with “Please Wait” or “Applying Microsoft Offline Files Policy”

Date : September 5, 2018
Hang on Startup with “Please Wait” or “Applying Microsoft Offline Files Policy”

Problem

On some computers, it is observed that the system hangs on startup with either “Please wait” or “Applying Microsoft Offline Files Policy” displayed. This issue may occur even if there are no Offline Files Group Policy Objects (GPOs) set.

Solution

This issue is often not related to Offline Files, but rather caused by running PowerShell scripts at startup. To resolve this issue, follow these steps:

  1. Remove any startup scripts applied to the computer through Group Policy.
  2. Ensure that the startup time has returned to normal.
  3. If the issue persists, try adding the startup scripts back one at a time, rebooting after each to identify the problematic script.
Applying Microsoft Offline Files Policy

Canon MFD: “Could not verify the information specified for Department ID Management”

Date : July 21, 2017

Issue

When attempting to print from a client, the following error message appears:

Could not verify the information specified for Department ID Management or User Management. Printing will be canceled. Refer to [Troubleshooting] in Help for more information.

This issue is specific to setups where a Canon copier/MFD is being used in a print server/client scenario and Department ID’s requirement is enabled.


Solution

To resolve this issue, you need to install the Canon Driver Information Assist Service on the print server. The installer for this service is called “DIASsetup.exe” and can be found in the “misc” folder on the driver installation directory.

Once the Canon Driver Information Assist Service has been installed on the print server, printing should function properly from the client.


Accessing the BIOS on Lenovo V110-15ISK laptop

Date : June 15, 2017

Accessing the BIOS and boot options are critical for installing Windows or PXE booting. If I’m being honest, it took me a few attempts to get into the BIOS for this model of laptop. If I put this info here it may help a fellow techie elsewhere..


To access the BIOS..

press Fn+F2


To access the Boot Menu..

press Fn+F12


@